Inverter mount orientation can be horizontal or vertical, depending on the installation instructions from the manufacturer. Horizontal installation is most commonly advised, but some manufacturers also specify vertical orientation.
Mounted vertically, the risk of dirt, metal filings, or water drops entering the cooling fan ports and causing damage to an inverter is high. The cooling fan ports should be oriented downwards to draw in cool air through the inverter and prevent things from falling into the vent openings.
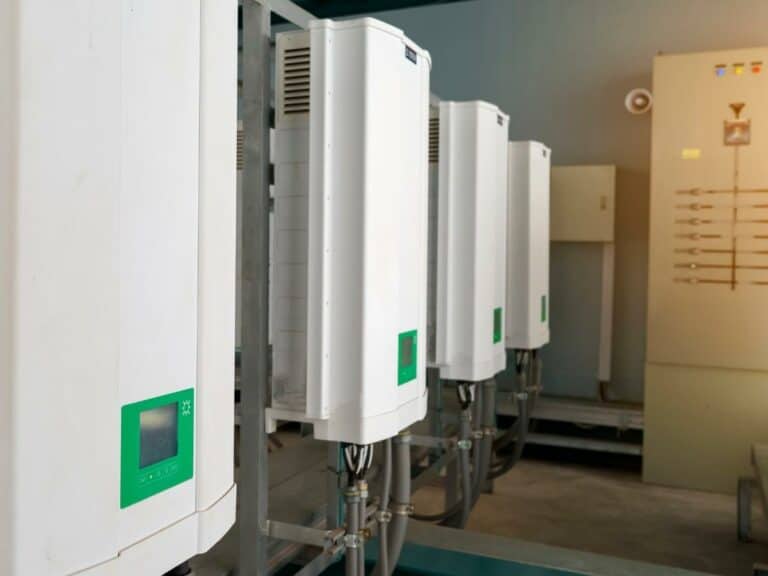
Inverters have cooling fan intakes on one end of the device enclosure and the AC outlets, charge ports, operational displays, Reset button, and On/Off button on the other face. Mounting the inverter in vertical orientation may make the AC outlets and operational interface display invisible. It would be best if you considered the following before installation:
- Is there sufficient vertical or horizontal space available?
- What is the risk of water, moisture, dust, and dirt entering the inverter?
- Which installation orientation will make it easy to see and operate the inverter?
- Is the intended installation space cool, dry, and well ventilated?
- Will the inverter be close to the battery bank?
Most inverter manufacturers advise that the device be installed in a horizontal orientation, but there are situations where this is not possible, and some precautions must be taken. Let’s consider what to consider when deciding where and how to best install the inverter.

What To Consider When Installing An Inverter?
The space constraints on yachts, RVs, tiny homes, and power utility rooms require that we consider the following factors and good practice guidelines when deciding where and in which orientation to install our solar or power inverter.
- The proximity of the inverter to the battery bank
- Easy access to see, hear and operate
- Sufficient space to allow for cable management
- A suitable location that offers good airflow and is cool and dry
- Design of the inverter cooling system and display panel
- Installation instructions of the inverter manufacturer
Even before purchasing the ideal inverter for your system, these considerations must be taken into account. If you are space-constrained and only have vertical mounting surfaces available, buying an inverter that must expressly be installed horizontally is unwise.
Yachts, RVs, and tiny homes often do not give you a lot of ideal installation options. The inverter connecting cables to the battery bank will be the heaviest gauge wire in your system and should be as short as possible.
Lead-acid batteries release hazardous and potentially explosive fumes that can adversely affect the wiring and cause corrosion of the inverter components and terminal connections. With Li-ion batteries, this problem does not exist.
Suppose the inverter manufacturer allows for vertical installation. In that case, this will likely be conditional upon ensuring that the cooling fan intakes are positioned downwards to prevent dirt and potentially harmful items from falling into the air intake openings.
There must be sufficient clearance below the intake openings to allow cool, dry air to be drawn into the body of the inverter housing. Convection of warm air will be upwards and assist the fans in circulating cool air through the device.
The battery connection terminals are generally located on the air intake end of the inverter. There must be a short distance between these and the battery bank terminals.
The inverter’s AC connection and control panel end must be visible and allow audible and visual alarms to be noticed. Vertical orientation with the control panel facing upwards presents the risk of dirt getting into the AC outlets and other power outlets.
A see-through shield should be installed above the inverter face to protect it from dirt or moisture entering the inverter.
Good cable management and clear labeling of components, connection cables, and switches are essential for visual management and maintenance. All cable connections must be color-coded and labeled with quality terminal connectors crimped on using a crimping tool.
The orientation of the inverter has to make allowance for all the factors stated and the manufacturer’s instructions. If the inverter failed and was not installed to the express instructions of the manufacturer, the warranty may be void.
The Three Biggest Mistakes When Installing An Inverter
Inverter failures or poor performance are normally traced back to three common mistakes that can be easily avoided with some forethought.
- Poor Installation Location
Heat is the enemy of electrical components and circuitry. Installing an inverter in a location that does not have adequate cool, dry airflow will result in a significantly shortened lifespan of the inverter.
The location has to be free of corrosive fumes, moist salty air, or other heat sources such as engines or generators. The harshest operating environment for electronic components is marine applications, where the challenges posed by the conditions require the use of specialized sealed and protected inverters.
Investing in sealed batteries that require no maintenance will eliminate the source of corrosive and potentially explosive gasses released by lead-acid batteries. Ensure that you have sufficient space for cable management and access to the inverter for maintenance and observing alarms.
- Poor Mounting
The mounting orientation of an inverter may be forced due to space constraints, but mounting the inverter close to a heat source or a source of high vibration will adversely affect the performance and lifespan of the device.
Always conform to the manufacturer’s mounting instructions and do not deviate from it as it may lead to a device failure and invalidate the manufacturer warranty. If you need to mount on a vertical surface, select an inverter that the manufacturer instructions define as vertical.
Identify your battery storage and power utility room and plan the layout, installation, and cable routing before buying any components.
- Incorrect Wire Sizing
The thickest gauge and shortest pure copper wire cable connect the battery bank to the DC input of the inverter. To minimize the voltage drop, these cables must be as short as possible to handle the current load from the battery to the inverter. The cables must be thick enough to prevent resistive heating in wires.
Having oversized wires on the DC input side of the inverter can only hurt your pocketbook but will ensure that the loads coming from a battery bank or solar array will never overload and overheat the DC input cables.
If the cables are too small on the DC input side of the inverter, it could also lead to inverter shutdown when inductive AC loads startup.
Appliances such as refrigerators, microwave ovens, or freezers have high inductive loads at startup for a few seconds. If the DC wiring cables are too thin, they may not cope with the power draw and cause the inverter to shut down.
References:
- https://www.emarineinc.com/blog/3-Biggest-mistakes-when-installing-an-inverter
- https://www.manualslib.com/manual/670237/Apollo-Solar-3224.html?page=11
See also: What Is A Solar Inverter? (Explained With Examples)
